Posts

Showing posts from 2013

Monday Minute: Skin Care

I know I post every now and then about things like skin care and health and beauty... even though this is a costuming blog...And here's why... You can make as many costumes as you want, you can have and wear more makeup than a MAC store carries, but you only get ONE face... unless you're good friends with a plastic surgeon... and you need to take care of it.  Now, I'll admit that I'm not perfect when it comes to practicing good skin care... I get lazy sometimes, and fortunately, I've got decent genetics that let me pass for younger than I actually am... But good skin care is very important and it doesn't matter if you're a girl or a guy... EVERYONE should take care of their skin.  The problem is, there's SO MUCH information out there and the market is saturated with products and miracle elixirs and such... so... where do you start... Well, I've mentioned The Cosmetics Cop before... and now I'd like to add the blog of Caroline Hirons . ...

1940's Radio Hour

Image
1940's Radio Hour Completed October 2013 Items Made: Jacket, Skirt. This costume was made for a local college production.  The "fun" part was that this show takes place on Christmas Eve in 1940.  The production was in October.  So buying an appropriate "After 5" ensemble was impossible therefore it had to be made.  Add to that, that the only festive fabric at the local fabric stores was the cheap holiday fabric that the fabric stores sell.  Oh, and I only had a few days to make it.  The jacket is made from stretch velvet burnout, which I flat lined to muslin to make it not stretchy.  And the skirt is made from costume satin, which was the only kind of fabric we could find that worked with the jacket fabric.  But I think I managed to pull off something decent. 

Soul Eater: Crona

Image
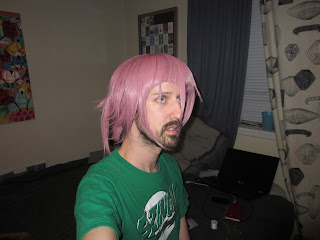
    SOUL EATER   Crona Completed August 2013 Items Made: Robe, Cuffs, Boot Covers, Wig  This costume started out as a clergyman's robe pattern which in the end became a heavily edited version of itself.  I chose a front closing robe as I thought it would be visually more interesting than just a form fitted gown.  The robe is made from crepe suiting with cotton lining.  The cuffs are craft foam covered in the same crepe suiting fabric and embellished with black piping and large wooden buttons.  The boot covers are also made from craft foam with black button detail. Both the boot covers and cuffs are detachable for ease of storage and travel. The wig was purchased and cut and styled by me and is the first wig that I've done where I actually like the finished wig.  I used the Aphrodite wig from Epic Cosplay and a package of the 15" wefts both in Dark Pink.  All I had to do was cut in the bangs/fringe leaving the uneven locks ...

Circle Lenses!

Image
Today I got a new pair of circle lenses in the mail and FINALLY recorded the circle lens video that I've been meaning to do for, like, a year now.  Hope you like it!!!

Shop & Tell August 2013

Image
I went out shopping the other day to buy some stuff for Crona.   These are my finds.   Stay tuned for the post that show what becomes of all these things!!!! *mad scientist laugh*

Crona Wig Completed.

Image
This is the first wig that I've cut and styled and am totally 100% happy with.... It helps that Crona's hair is really unkempt and uneven... so my cutting job didn't have to be perfect.  But still, I REALLY like how this turned out.  I started with the Aphrodite wig in Dark Pink from Epic Cosplay... I also bought a pack of 15" extensions in the same color, Dark Pink. Click the pic to go to Epic Cosplay This wig was pretty much perfect.  All I really had to do was cut in the bangs/fringe and then sew in the long locks in the back using the extensions.   And here's finished pics... There will be some hairspray and stuff added when it's actual convention time...  also, these'll probably look better when I'm less beardy.  

Work Vlog: Jack Skellington Mask Session 1 and Updates

Image
In keeping with my Prop Making adventures.. Here's Jack's mask. So I started with a Pepakura model for Jack Skellington which I had to enlarge to fit over my noggin.  Here's video with annotations on putting together the paper model. Then when I all done, it looked like this.  Then several weeks later, I coated the outside with resin for sturdiness.  However the saturation of the cardstock caused the model to warp and the heat from the resin curing melted the hotglue in a few places, so that'll have to corrected before I can move on.  But here's pics.  You can see, Jack's a little more egg-shaped now, but I SHOULD be able to correct that.   Lastly, here's a few pics with the eyes and mouth partially opened up.  The mask might be a TAD large, but I eventually want to work up to Jack on stilts with arm extensions so the mask will be good then.  I'll basically have visibility through the mouth.  And maybe I can put fa...

RTX 2013

Image
Weiss from RWBY So back in 2012, a couple of friends of mine attended RTX in Austin, TX and basically told me I HAD to go.  Fast forward to 2013 it's a couple weeks before RTX and I ask a friend of mine if she wants to go.  She's a writer for Crunchyroll and pulled some strings to score us press passes.  SWEET.  It was an awesome con.  It's mostly gaming.  Rooster Teeth is a website/company most known for it's Red vs. Blue series.... and let me just say, they host an amazing con--especially for a con that's only in its third year.  Everything was organized and well-planned and I had a great time... I'm pretty sure the press pass helped... Also... these.... If you're legal, you can buy these in the dealer room. But what was really awesome was the premiere of RWBY (pronounced 'Ruby').   It's only in it's 5th episode, but it's already shaping up to be a good series.  One thing the guys at Rooster Teeth are getting good...

A promise to catch up...

So I've just looked at my last entry here and it was back in June... I am SO SORRY!!!! I've been such a horrible blogger.  But hopefully you've been following my Facebook or my YouTube channel and have seen some of my more recent activity. So here's a bullet point list of some of the things that have happened since I've last posted.  And I promise to expand on some of these in short time...these are in no particular order... for now, progress pics can be found on my Facebook page and videos can be found on my YouTube channel. In the past 2 months I... Went to RTX in Austin.  Saw the premiere of the RWBY.  Which you should be checking on on roosterteeth.com.  RWBY is a new anime series and one of, if not, the first American made animes ever.  Posted a workvlog video of a new mask for Jack.  The video is on my YouTube Channel. Got a wig for Crona and cut and styled it. Made serious progress on Crona and hope to finish it in the next few days aka...

I made NEW video!!!

Image
 I guess this is more like a vlog video... but I've decided to occasionally turn on the camera and film when I work and then edit the footage plus add commentary.  I suppose these will be sorta tutorials and sort of vlogs... Anyway, hope you enjoy it and let me know if you'd want to see more of these. This one will be for my Ragnarok Demon prop for my Crona costume.  (See the pic above). Anyway, here's the video. Until next time!!! Jason

Monday Minute: Crayon Lipstick??!?!?

Image
Hello All!  So, I love YouTube videos and I stumbled across this one the other day and I HAD to share. This is a really simple process of using ordinary crayons to make lipstick. It just uses a few ingredients... castor oil, shea butter, a crayon and optionally, food grade essential oil.  Watch the video to see how easy it is... and also check your current makeup to make sure it's safe.   The really cool thing to remember is you can mix up crayola colors to make different shades... and don't forget that you can use lipstick as blush or even eyeshadow...  Have fun! Jason

Monday Minute: Pepakura

Image
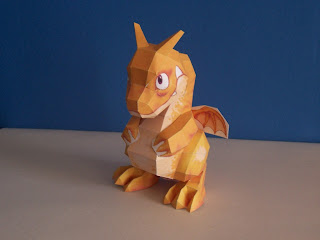
Hello Cosplayers!!! Today I wanted to share a bit of info about the Pepakura Software. First of all what is it?   Well, Pepakura is a software that lets you take computer generated 3-D models and break them down into a 2-D format so you can print them out on cardstock and reassemble them.  If you google it, you can find some pretty amazing models out there and even tons more files you can use with the software to make models of your own.  Like this little guy. The software is available at  http://www.tamasoft.co.jp/pepakura-en/ And is free.  Well... The Pepakura Viewer software is free.  And it’ll allow you to open, view, and print Pepakura files.  However, you’ll be unable to alter them as the Viewer version of the software is pretty limited. You can pay for the Pepakura Designer software, which WILL let you manipulate the files, but there’s a one time fee of $38.00 USD.  If you plan to do a lot of this, it’s probably worth it. ...

And now for a change of pace....

Image
Remember this guy? Well, there's nothing wrong with him... but  I can't quite figure out how to finish him... without him being really heavy...  So, I'm gonna try using the pepakura technique that alot of people use to make armor...  I found a pepakura Jack... and I printed it out...  Well, here's what I have after many hours of work...  This was sort of a trial run... I've never done pepakura before... Maybe I should clarify what pepakura is... Pepakura is a Japanese software.. actually, without looking it up, I'm pretty sure Pepakura is short for Paper Craft... or Pepa Kurafto   in Japanese... but don't quote me on that...but the software allows you to print out 3 D models on cardstock that you then cut out and glue together... Anyway... some super crafty people on the internet figured out that they could resize the models to be life size... so they started printing out and making armor and props and stuff...  After you get you...

AAAAAAAAAAAARRRRRRRRRRRRRGGGGGGGHHHHHHH!!!!!

Image
So... a month or so ago, I bought this pattern....    As you can see it's vintage.. therefore rare... and usually expensive.  At the time there were two sizes I could find for sale on the web... A boy's Large and a Men's Large... or maybe it was an extra large...  The Boy's large was only 15 bucks and the Men's was for 30 or 35 bucks... The boy's is also closer to my chest size...  So foolishly, I bought the boy's pattern... thinking I could easily resize it to fit me.. Well that was dumb... because this is a huge pain... I just spent 3 hours working on the back panel and I can't get it to work...  I don't know if I wanna scrap it and start over with a new idea/pattern... Maybe I'll go back to my original idea of using the priest robe and just cutting it off at the hip...  I think I'll sleep on it... hahaha... Moral of the story... sometimes costumes are evil and make you wanna cry. Good night. Jason 

The Sorcerer: The Mothers

Image
    The Sorcerer Lady Sangazure, Mrs. Partlet, Villager Mother Completed March 2013 Items made: Jackets The Sorcerer is Gilbert & Sullivan operetta written in 1877.  The great thing about G&S operettas is that they're quick, quirky, and fun!  It's pretty much the SNL of opera.   For this show, we (the costume designer and I) went kind of Victorian but not completely and set it in the Spring so lots of color!   So the fun bit about the Mothers in this show is that one of them was double cast -- meaning that there were two actresses playing Mrs. Partlet.  So when an actress wasn't playing Mrs. Partlet, she had to be in a different costume.  But that's not the fun bit.  The fun bit was that one of the Mrs. Partlets got sick the week the show opened and never performed.  So one of the costumes I made (The Village Mother) never got worn.   With the women playing the mothers, w...